If you are reading this article, it might be because you have a client who has chosen to use gtag.js instead of Google Tag Manager for their GA4 implementation. Rest assured; you are in the right place.
In the past months, I have also navigated the complexities of gtag.js implementation. Recognizing the limited resources available on this topic, I’ve run two surveys on Twitter and LinkedIn to gather insights into what folks are thinking. And they blew up in my face, especially on Twitter. But I decided to do this for myself and you.
Although gtag.js may not be the generally preferred method, it’s still a valid approach, even though many people would disagree.
In this article, I’ve done the legwork so you don’t have to, providing useful information on implementing gtag.js for GA4 and what you should be aware of when you audit an implementation like this.
I am in no way supporting using gtag.js over Google Tag Manager. Let’s get that out of the way.
I am just acknowledging there are companies out there that, for some reason, don’t want to use Google Tag Manager or can’t use it and decide that gtag.js is the better solution for them. And because these companies might be your clients, they will also need the same level of support you give to classic GA4-GTM implementations.
When I normally do an audit for a Google Analytics 4 implementation, I look at three main things, the actual settings in GA4 (related to config admin, property, data settings retention, etc.), then I look at the actual configuration, which can either be done through Google Tag Manager or through gtag.js;
Lastly, I do a privacy audit (in this context, related to how consent mode is implemented and cookie management solution implementation).
In this article, I am only covering the second part of a regular audit, which, as the title suggests, is how the configuration is being done for a GA4 property. In our case here, using gtag.js. So let’s dive in!
What is gtag.js?
The Google tag (gtag.js) is a single tag you can add to your website to use a variety of Google products and services. Instead of managing multiple tags for different Google product accounts, you can use the Google tag across your entire website and connect the tag to multiple destinations.
The history of gtag.js can be traced back to the early days of Google Analytics when the tracking code was implemented using a library (thanks, Doug Hall) called ga.js. In 2013, Google released a new version of the tracking script called analytics.js, which provided improved functionality and better performance.
In October 2017, Google introduced the gtag.js library to replace ga.js and analytics.js. The purpose of gtag.js was to simplify implementing different Google tags on a website, allowing developers to use a single, unified interface to manage all their tags.
This release also included better support for Google Ads, making it easier for advertisers to track conversions and manage their campaigns. In August 2018, Google emphasized the importance of sitewide, first-party tagging for better conversion measurement and optimization, recommending gtag.js as a dynamic library for maintaining flexibility in the evolving industry.
In a 2018 announcement at SMX East, Google shared new innovations to help local and omnichannel marketers drive more foot traffic to business locations using location extensions across Search, Display, and YouTube and local inventory ads for Shopping campaigns.
Gtag.js played a crucial role in providing a holistic view of conversions, enabling advertisers to measure the full impact of their ads across online and offline channels and understand how their digital campaigns drive in-store performance. (Thanks, Charles Farina)
With the release of GA4 in October 2020, gtag.js became the recommended implementation method for the new version of Google Analytics. The library is designed to work seamlessly with GA4’s event-based tracking model, making it theoretically easy to track user interactions and events on a website.
So in Google’s words: gtag.js represents the latest evolution in the development of Google’s tracking libraries and provides a more streamlined and user-friendly approach to implementing Google tags on a website.
The Google tag lets you send data from your website to linked Google product destinations to help you measure the effectiveness of your website and ads. The Google tag is currently only accessible and configurable from Google Ads and Google Analytics 4.
Google Support
gtag.js and Google Tag Manager
Implementing GA4 through gtag.js, in theory, is more straightforward but implies limited customization options and requires manual updates to the code.
Implementing GA4 with Google Tag Manager offers more flexibility and ease of use. Still, it can be more complex to set up and potentially slow down page load times if not optimized correctly. It also offers more collaboration options and built-in debugging tools.
Ultimately, the choice between the two methods will depend on the specific needs and goals of the implementation. CONTEXT MATTERS.
While I recommended reading Julius Fedorovicius’ article for a more in-depth breakdown between the two, on a tl;dr level, these are the main differences for a GA4 implementation using both methods.
NOTE: This is NOT a feature comparison between the two – as for as I am aware, anything that gtag.js does – Google Tag Manager can do it too. This comparison aims to give anyone reading this a better understanding of how these two work.
Implementation Complexity
GTAG: It can be tested directly on the site but requires dev experience and access to code.
Google Tag Manager: Config tag is pretty straightforward, but it can be more complex and require more setup (depending on the client’s business)
Flexibility
GTAG: Limited to basic tracking functionality
Google Tag Manager: Offers greater flexibility to customize tracking and trigger options
Ease of use
GTAG: It can be easier for smaller implementations
Google Tag Manager: It can be easier for larger or more complex implementations
Maintenance
GTAG: Requires manual updates to code
Google Tag Manager: It can be updated and managed through its interface
Testing
GTAG: It can be tested directly on the site but requires dev experience and access to code
Google Tag Manager: Requires publishing and testing through the GTM interface
Collaboration
GTAG: Not much. Limited access to code
Google Tag Manager: Allows for multiple users to manage and collaborate on tracking
Performance
GTAG: It can load faster as it is a smaller file
Google Tag Manager: It can potentially slow down page load times if not optimized correctly
Integration
GTAG: It can be integrated with other tracking scripts using gtag API
Google Tag Manager: Can integrate with other Google services and third-party tools
Debugging
GTAG: Requires direct debugging of code
Google Tag Manager: Offers built-in debugging tools for easier troubleshooting
How to audit a gtag.js GA4 implementation (step by step)
Step 1: Check if the GA4 tracking code has been installed correctly on all the website pages
Use a browser extension to systematically verify the presence of the GA4 tracking code on each page, ensuring that no pages are unintentionally excluded from tracking.
Step 2: Verify that the correct GA4 property ID has been used
Cross-check the GA4 property ID in the tracking code with the one displayed in your Google Analytics account, taking care to ensure there are no typos or discrepancies. Shit happens 🙂
Step 3: Confirm that the GA4 tracking code has been implemented before the </head> tag
Take a look at the HTML source code of your website pages to verify that the GA4 tracking code appears before the closing </head> tag, which helps facilitate accurate data collection and faster page load times.
Step 4: Check if the GA4 tracking code has been implemented using the latest version of gtag.js
Compare the gtag.js version used on your website with the version mentioned in the official Google Analytics documentation to ensure compatibility and access to the latest features.
Step 5: Ensure that the GA4 tracking code has been implemented only once per page
Inspect the source code of your website pages to identify and remove any duplicate instances of the tracking code, which can cause data inconsistencies and inflated metrics.
Step 6: Confirm that the GA4 tracking code is firing on all relevant pageviews, events, and conversions
Use Debug View or your favorite browser extension (mine is this) or both! To monitor real-time data capture during user interactions with your website.
Step 8: Verify that the data being collected by GA4 is relevant to the website’s business objectives
Assess the tracked metrics and dimensions to ensure they provide meaningful insights into user behavior and support data-driven decision-making aligned with your website’s goals. THIS IS THE MOST IMPORTANT PART – although slightly irrelevant to an implementation. But again, context matters. Ensure you are collecting useful things, not random stuff – or worse – everything.
Step 8: Ensure that the correct data is sent to the correct event parameters, such as event_name, item_name, etc
Review the event parameter configurations in your tracking code and cross-check with your data collection plan to verify accurate and consistent data mapping.
Step 9: Verify that custom dimensions and metrics are correctly implemented
Confirm that custom dimensions and metrics are properly registered in GA4 as custom definitions and mapped to their corresponding data parameters in the tracking code. Remember that, in GA4, custom dimensions, and metrics are replaced by custom parameters for events and user properties.
Google Analytics automatically provides several dimensions and metrics. If the business needs to track a data point that is not part of the ones already provided by GA out of the box, it is possible to define custom dimensions and/or custom metrics.
A custom dimension has either an event scope or a user scope. A custom metric always has an event scope.
Event scope: For example – the Author dimension can have an event scope.
User scope: Create user-scoped custom dimensions to identify static or slowly changing attributes of your users, such as “spender=true,” “profession=engineer,” or “favorite_team=Liverpool.”
Step 10: Check out that your referral exclusion list is correctly set up
Examine your GA4 referral exclusion settings to confirm that self-referrals and other unwanted referral sources are excluded, preventing skewed data and inaccurate attribution.
On this point:
a) Evaluate whether to exclude or test internal traffic.
In order to be able to filter out internal traffic, you must first define it. Internal traffic can be defined under Data Streams > Configure Tag Settings > Define internal traffic. In this section, it’s possible to specify the IP addresses of the devices or computer networks that need to be identified as internal traffic.
b) Remove unwanted referrals like third-party payment processors and website-managed interactions.
Step 11: Check if cross-domain tracking is correctly implemented if the website has multiple domains.
Review the ‘_gl’ linker parameter implementation and associated configurations in your tracking code to ensure seamless user session tracking and attribution across multiple domains.
Word of advice: Cross-domain tracking can be shitty in GA4 and has changed from how it was in Universal Analytics. Yes, still asterisk madness. More here.
Step 12: Take a look at how consent mode is implemented
Audit your data collection practices and consent management system to ensure adherence to data privacy regulations and proper handling of user consent.
Consent Mode…requires an article on its own. This is a very important topic to cover, and I won’t do it justice in 3 sentences but don’t neglect this aspect. It affects absolutely everything in data collection, and most importantly, it has a huge ethical value to your users. Do better. Simo’s article saved me a few times.
Oh, and please, make sure you don’t find any PII in your GA4 reports. Please take time to verify if that is something that is happening. You can do that using Explorations, and take a look at page URLs and see if there are some sneaky PII leaks. You DO NOT want that.
Step 13: Verify if the ecommerce implementation is correct (if the use case fits)
– Cross-check your website’s source code to confirm that the gtag.js snippet is present on every page and that the ecommerce event tracking code is correctly implemented. This is how it works.
– Test the user flow on your website, including product views, add-to-cart actions, checkout, and purchase completion. Make sure that each event is triggered when the corresponding action occurs.
– Use the Realtime report and DebugView in your GA4 property to monitor incoming data and events. This will help you identify any issues or missing data in your implementation.
– Review the ecommerce data in your GA4 reports for accuracy and consistency. Ensure that key metrics, such as revenue, transactions, and product performance, align with your internal records.
(Thanks, Jared R Smith, for the pointers with the datalayer)
Step 14: Verify that Enhanced Measurement settings are set up correctly if used.
Make sure to customize this feature based on your specific needs (e.g., Enable Site Search if the website has a site search option; make sure the query string parameter used to hold the search term information is present in the Site Search parameters list)
Check the configuration of Enhanced Measurement settings in GA4, confirming they are tailored to your website’s specific tracking requirements and user interactions.
What should this look like as a page of your audit?
Add your findings from the steps above to your audit. Feel free to structure it based on your audit template.
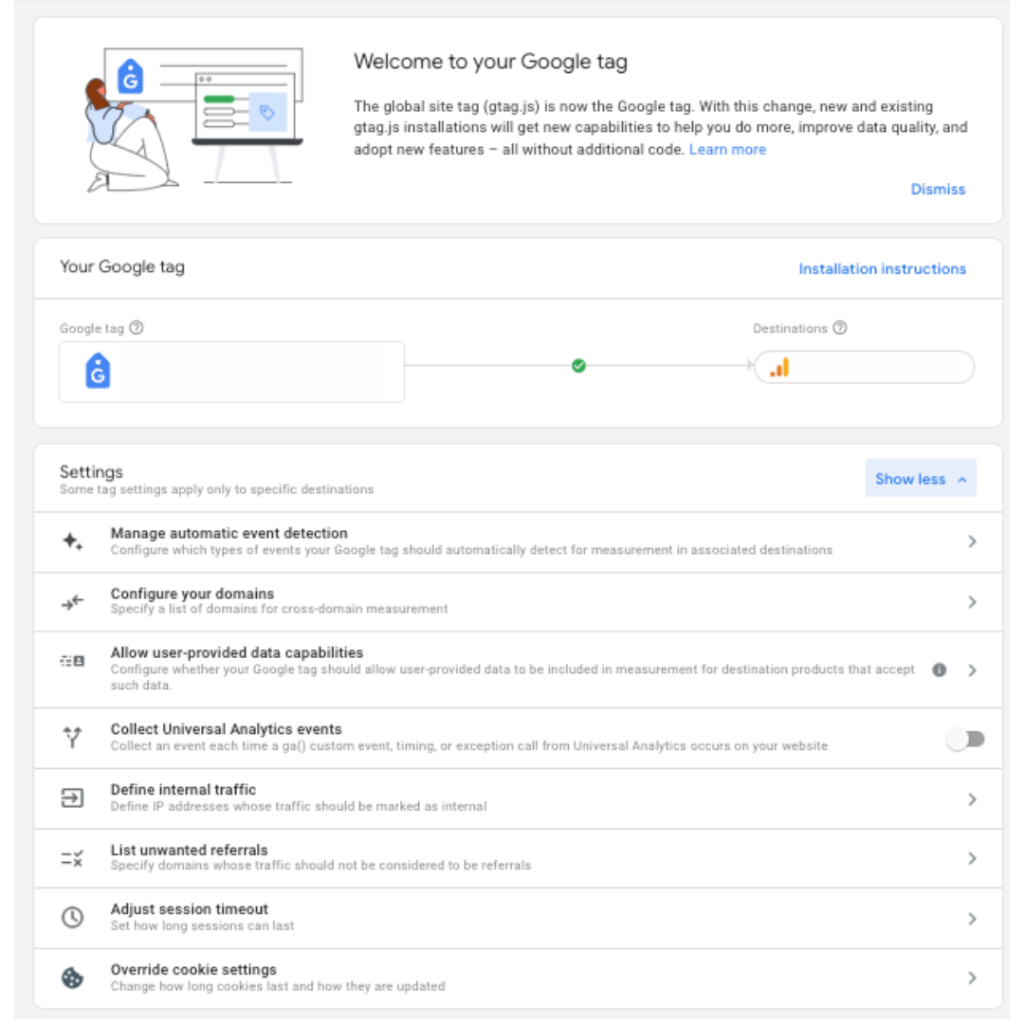
Besides the steps above, for my first gtag audit, I took this template below directly from the Google Documentation – this covers the main settings you will see for your gtag in the GA4 interface.
GTAG.JS IMPLEMENTATION – REVIEW
| Setting | Notes |
|---|---|
| GTAG.JS sitewide | Define if detected or not |
| Tag destinations | (G-tracking code): Property name Google Ads account |
| Manage automatic event detection | GA4 automatically tracks certain user interactions, such as page views, scrolls, and outbound clicks, without requiring additional implementation. However, you may want to enable or disable specific automatic events based on your tracking requirements. |
| Configure your domains (cross-domain measurement) | Configure whether your Google tag should allow user-provided data to be included in the measurement for destination products that accept such data. |
| Allow user-provided data capabilities | Configure whether your Google tag should allow user-provided data to be included in the measurement for destination products that accept such data. * relevant for Google Ads, not Analytics |
| Collect Universal Analytics events | Collect an event each time a ga() custom event, timing, or exception call from Universal Analytics occurs on your website. (ALTHOUGH … it’s kinda over for that) |
| Define internal traffic | Defining internal traffic in GA4 helps you identify and filter out traffic from your own organization, preventing it from skewing your analytics data. |
| List unwanted referrals | Unwanted referral traffic can affect your data quality and attribution. In GA4, you can create a referral exclusion list by navigating to Admin > Data Settings > Data Filters in the GA4 property. |
| Override cookie settings | GA4 and gtag.js use cookies to store user-level and event-level data. You can override your Google first-party cookie settings. Google tags use first-party cookies for various purposes. These cookies have default expiration and update settings, but you can customize these settings by overriding them. Learn more about cookies and user identification |
| Adjust session timeout | In GA4, the default session timeout is set to 30 minutes of inactivity. While there is no direct method to adjust the session timeout in gtag.js for GA4, you can use the ‘engagement_time’ event to track user engagement and customize the session duration by sending regular ‘engagement_time’ events based on your desired session length. |
My experience with both gtag.js and Google Tag Manager
Having worked with gtag.js and Google Tag Manager, I’ve come to appreciate each method’s unique benefits and challenges. While my personal preference leans towards Google Tag Manager due to its flexibility, ease of use, and collaboration features, I’ve learned to adapt and understand the nuances of gtag.js for smaller implementations.
Each method has its own set of advantages and drawbacks. Still, the key takeaway is that, as an analyst or consultant, it’s crucial to be adaptable and understand the different approaches to best serve your clients’ needs.
Final thoughts
Auditing a GA4 implementation using gtag.js might initially seem like a daunting task, especially if you’re used to working with Google Tag Manager. However, I hope that by following the step-by-step guide I provided in this article and understanding the key differences between the two methods, you’ll be well-equipped to tackle any gtag.js GA4 implementation that comes your way.
Always remember that the end goal is to ensure your clients receive accurate and actionable data that helps them make informed decisions about their business. Whether they use gtag.js or Google Tag Manager, your expertise in auditing their GA4 implementation should be top-notch.
As Google continues evolving its products and services, being prepared for both gtag.js and Google Tag Manager will ensure you’re ready to tackle any challenge and provide quality service to your clients.
Happy auditing!